 Too Long; Didn't Read
If you’re sitting on a stack of old backup servers and wondering how to turn them into something modern, this is where we start.
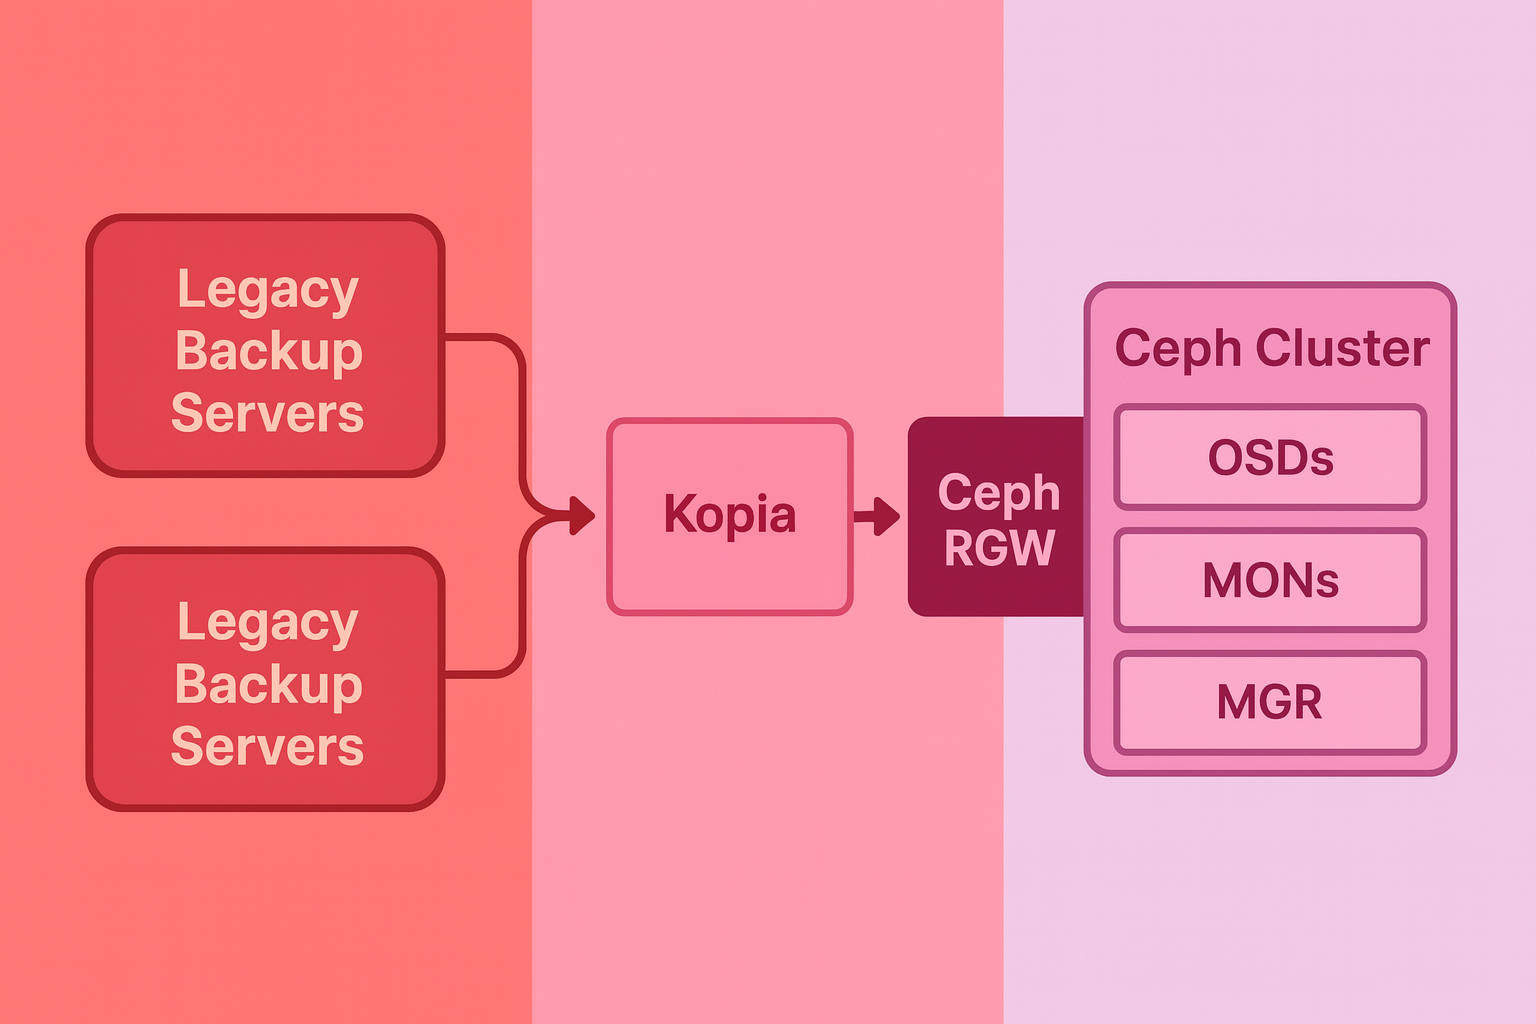
The goal of this series is simple take traditional hardware, layer Ceph’s S3‑compatible storage on top, and integrate Kopia for encrypted, deduplicated backups that actually scale.
This first part is all about planning. Before we even think about spinning up Ceph or pointing Kopia at an endpoint, we need to make sure the hardware and OS are prepped correctly. This is where most setups either succeed long term or turn into a headache later.
MordernRobustScalable Backup Solution
We could also add an Optional ingress layer with HAProxy or Nginx for TLS and load balancing. Think of this idea as shown in this figure – It’s lean, it’s on‑prem, and it works even with hardware that’s seen better days.
Hardware Requirements (The Realistic Version)
So while it works on backups that you already have – we still need a powerful system to get this working. Although this can be scaled to enterprise level. Ceph does have some baseline needs you shouldn’t ignore.
Ceph is happy to work on your old hardware, but If you’re using really old hardware, keep OSD count per node low and prefer SSDs for journals. Ceph will happily eat slow disks alive if you don’t tune for it.
Network Planning
Network plays an important part of this setup as the data is going to be transferred incrementally over the network. You will want to separate the network setup to:
- Cluster network: Internal Ceph traffic.
- Public network: Where RGW and your backup servers connect.
- Use a separate VLAN or NIC if you can.
- Enable jumbo frames (MTU 9000) if your switches and NICs support it.
Backup jobs will thank you later.
4. OS Choice
For this stack we are going with the most popular choice, Ubuntu 22.04 LTS is my go‑to:
- Ceph’s
cephadmworks flawlessly. - Kopia has native
.debpackages. - Long‑term support means fewer surprises.
CentOS Stream 9 / Rocky 9 and Debian 12 also work, but Ubuntu hits the sweet spot for legacy hardware + modern Ceph. Remember we are trying to repurpose the whole backup structure, so lets go with the Ubuntu.
5. Prepping the Servers
Lets get started with this – Once the servers are installed with Ubuntu – do a standard installation with all space allocated to the /. Once this is done, the next part is to prepare the server for our backup setup.
For this we need to get the packages installed:
sudo apt update && sudo apt -y upgrade
sudo apt install -y lvm2 chrony curl gnupg
The standard option – idea here is to make sure that the packages are upto date and we do have all the essentials like Chrony, curl and gnupg setup. Ceph does maintain a strict protocol when it comes to time, so please do run:
sudo systemctl enable chrony --now
The next process is to ensure that the whole backup network is connected through internal IP’s. You can choose your own setup but for this test environment what I did was to define it like the following on the /etc/hosts file – eazy peazy:
10.0.0.11 ceph-pixel-mon1
10.0.0.12 ceph-pixel-mon2
10.0.0.13 ceph-pixel-mon3
10.0.0.21 ceph-pixel-osd1
10.0.0.22 ceph-pixel-osd2
10.0.0.23 ceph-pixel-osd3
10.0.0.31 ceph-pixel-rgw1
10.0.0.32 ceph-pixel-rgw2
Kernel Tuning
Another more important step to this process is to tune the kernel – this should be done across all the nodes on the cluster and it is important that you do it so that Ceph doesn’t cause issues later. Ceph OSDs create thousands of file descriptors and perform parallel I/O operations. RGW nodes handle many concurrent HTTP/S3 connections and MONs rely on low-latency networking for quorum and cluster maps.
So each of these kernel tweaks assist the whole setup to ensure that you do get the best of performance from each component. If the kernel defaults are left untouched, you can hit file descriptor limits, TCP buffer shortages, and I/O latency spikes, especially on legacy hardware.
This ensures that Ceph is able to handle large volume of files created from the daemon.
echo "fs.file-max=262144" | sudo tee -a /etc/sysctl.conf
Keeps the kernel from aggressively swapping Ceph daemon memory to disk.
echo "vm.swappiness=10" | sudo tee -a /etc/sysctl.conf
If you do have a faster SSD and larger RAM then you can also try:
echo "vm.dirty_ratio=10" | sudo tee -a /etc/sysctl.conf
echo "vm.dirty_background_ratio=5" | sudo tee -a /etc/sysctl.conf
This defines the amount of data that remains on RAM and will help with I/O during the process
Allows large TCP buffers for high-throughput backup streams to RGW.
echo "net.core.rmem_max=268435456" | sudo tee -a /etc/sysctl.conf
echo "net.core.wmem_max=268435456" | sudo tee -a /etc/sysctl.conf
echo "net.ipv4.tcp_rmem=4096 87380 268435456" | sudo tee -a /etc/sysctl.conf
echo "net.ipv4.tcp_wmem=4096 65536 268435456" | sudo tee -a /etc/sysctl.conf
echo "net.core.somaxconn=4096" | sudo tee -a /etc/sysctl.conf
Make sure you do this for all the nodes and keep the servers ready before Ceph deployment
sudo sysctl -p
After the kernel changes are made, all that remains is to ensure that the drives are wiped clean, you can run the standard format command or use:
sudo wipefs -a /dev/sdX
You do not need to worry about the partitioning as this will be handled by Ceph. Ceph will handle partitioning with ceph-volume or cephadm.
You are all set for the part 1 of this setup – now ensure that you do have the latest SSH key created
ssh-keygen -t ed25519
ssh-copy-id pixel@pixel-node1.local
You will have to copy your key to each of the nodes to get access securely. Please do prevent direct root access as it is best to run the commands as sudo user.
You’ve now built the foundation that every reliable Ceph RGW + Kopia backup environment needs. The hardware is planned, the network is clean, the OS is tuned, and your legacy servers are ready to transform into a modern S3-compatible backup system.
In Part 2, we’re diving straight into the heart of the project: bootstrapping your first Ceph cluster, deploying MONs and OSDs, and preparing the storage layer that will power your S3 buckets. We’ll cover every command, explain what’s happening under the hood, and make sure your setup is production‑ready, even if you’re running on aging hardware.
If you want a step‑by‑step Ceph S3 tutorial that’s written for real‑world servers (not lab-perfect conditions), you don’t want to miss Part 2. Bookmark this series, share it with your team, and come back when you’re ready to bring your backup infrastructure to life.
Next up: “Part 2 – Installing Ceph and Building Your First Cluster for S3 Backups”


[…] you haven’t already – check out the first and second part of this […]
[…] Ceph RGW Setup Guide […]