 Too Long; Didn't Read
In the rapidly evolving world of containerized infrastructure, Kubernetes has become the industry standard for orchestrating applications at scale. Its declarative model, robust self-healing, and scaling capabilities have made it indispensable for cloud-native architectures.
But beyond its core concepts of Pods, Deployments, and Services lies a lesser-known but highly powerful feature: Init Containers.
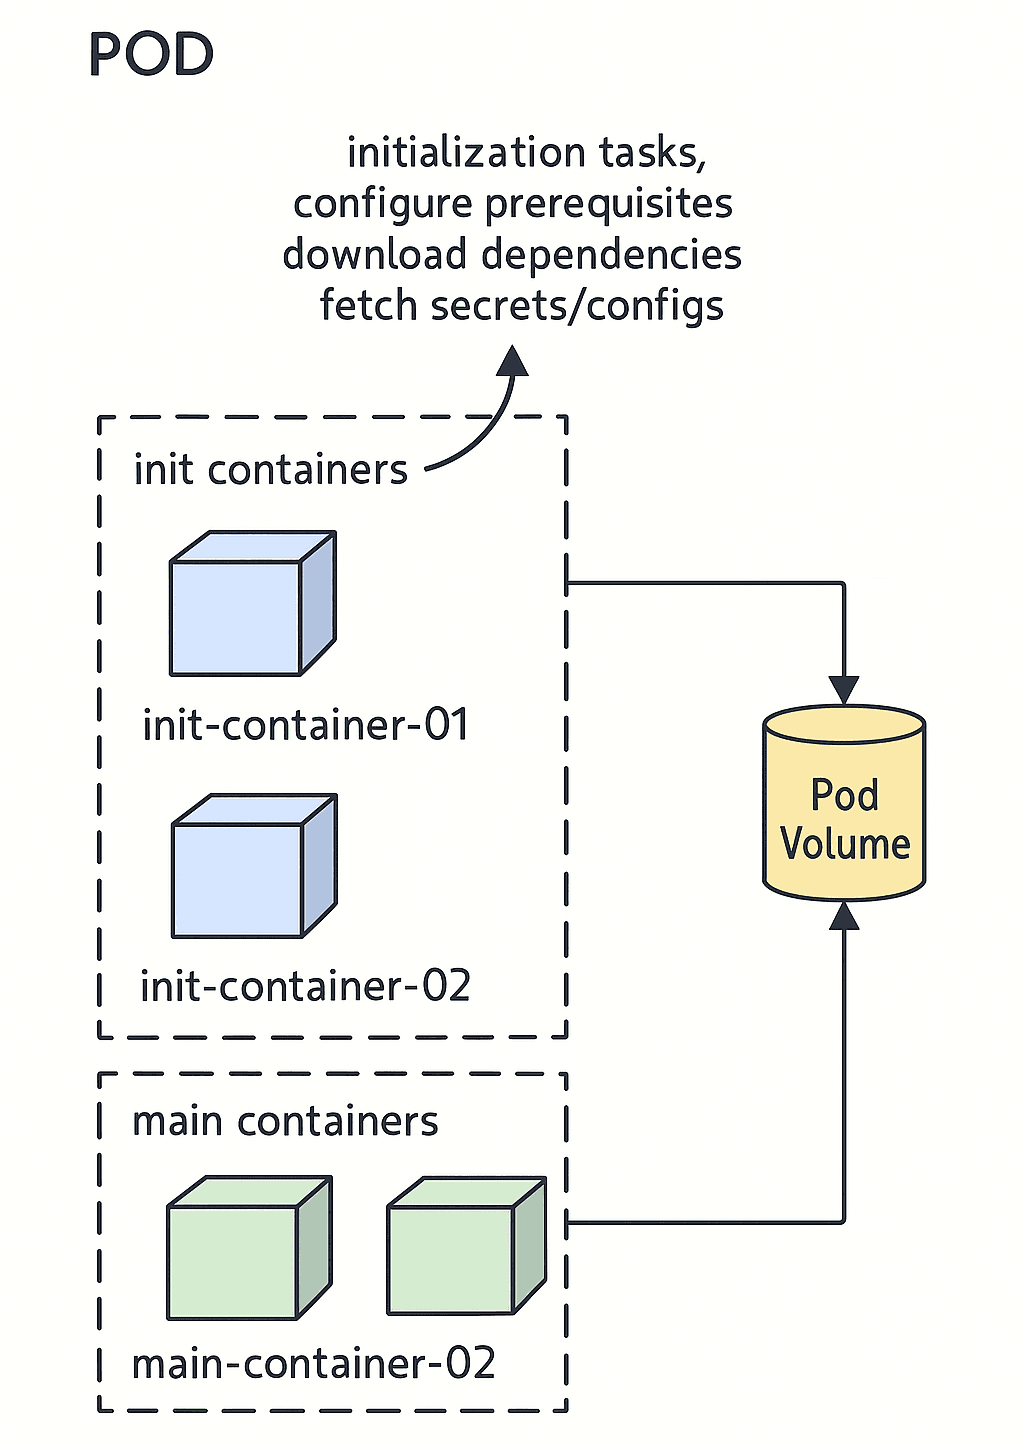
While the main containers in a Pod handle the core application logic, there are often critical setup operations required before an application can function properly. These might include creating directories, initializing configuration files, fetching secrets securely, or waiting for dependencies to become available.This is where Init Containers play a vital role offering a clean, isolated, and controllable mechanism to handle these tasks separately from the main application logic.
In this tutorial, we’ll not only explore what Init Containers are, but also why they matter, how they work behind the scenes in Kubernetes, and how to implement them effectively in real world scenarios.
What is an Init Container?
By definition, a Kubernetes Init Container is a special type of container that runs inside a Pod before any of the application (main) containers start. It runs to completion meaning it must exit successfully and each Init Container runs sequentially, ensuring a controlled environment setup.
Unlike main containers:
- Init Containers are designed for one-off tasks like downloading files, initializing databases, or fetching configuration.
- They run in the same network and storage namespace as the main containers, making it easy to pass information via shared volumes.
- If any Init Container fails, the Pod is kept in a Pending state and retried according to the Pod’s restart policy.
This separation of concerns aligns with cloud-native principles:
“Do one thing, and do it well.”
By using Init Containers for setup and main containers for application logic, your deployments become cleaner, more maintainable, and easier to troubleshoot.
To put it simply, init containers can ensure your applications are always properly configured and initialized before they are started.
How Init Containers Work
Before we dive deeper into configuring Init Containers, it’s essential to understand how they function inside a Kubernetes Pod. While they look similar to regular containers, their purpose and behavior during a Pod’s lifecycle are quite different.
Here’s a clear overview of how Init Containers operate:
- Executed One by One, In Order
When a Pod is created, Kubernetes reads the Init Containers in the order they’re listed in the Pod’s manifest. It starts the first Init Container and waits for it to finish successfully before moving on to the next.
Only one Init Container runs at a time this is called the sequential startup order. Kubernetes makes sure each Init Container completes its job before starting the next one in line. - Run Before the Application Containers
Init Containers are designed to run before the main application containers in the Pod. Until all Init Containers have successfully completed, Kubernetes will not start the application containers. This ensures the environment is properly set up and ready for your application to run smoothly. - Run Again If the Pod Restarts
If a Pod is restarted whether due to node issues, resource pressure, or a manual deletion all Init Containers are executed again before the main containers. This guarantees a consistent and predictable initialization process every time a Pod comes up. - Operate During the Pod’s Pending Phase
In the Kubernetes Pod lifecycle, Init Containers run while the Pod is in thePendingstate. Only after all Init Containers have finished will the Pod move to the - state, starting the main application containers.
- Limitations Compared to Regular Containers
While Init Containers use the same basic container spec fields (likeimage,command,env,volumeMounts), they differ when it comes to lifecycle and health checks.
By default, Init Containers do not support:
livenessProbereadinessProbestartupProbelifecyclehooks likepostStartandpreStop
However, starting with Kubernetes v1.28 (and fully stable in v1.33), there’s a feature called Native Sidecars. It allows you to run an Init Container persistently alongside the main application containers by setting restartPolicy: Always. These Native Sidecars behave more like regular containers and can use lifecycle probes.
Common Use Cases for Init Containers
Init Containers might seem like a small feature at first glance, but they’re incredibly powerful when you know where to apply them. Their job is to handle one-time setup tasks before your main application containers run. The beauty is, you can use them for all kinds of things depending on what your application needs.
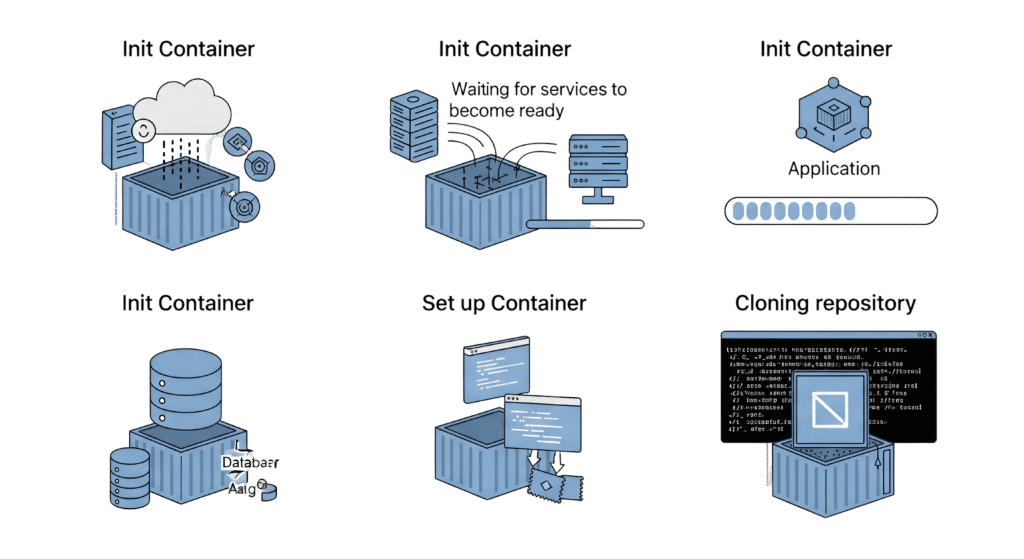
Let’s go through some of the most common, real-world use cases:
Load Dependencies Before Startup
If your application needs specific files, libraries, or configurations that aren’t packaged inside the container image, an Init Container can fetch and prepare them. This ensures the main container starts with everything it needs.
Set Up a Database Schema
Many apps rely on a database that must be initialized before use. You can use an Init Container to run database migrations, create tables, or seed some default data before the main application connects to it.
Preload Cache Data
If your service uses caching systems like Redis or Memcached, an Init Container can preload frequently used data into the cache. This reduces cold start times and improves initial performance right after deployment.
Configure Networking Requirements
Some applications require certain network routes, proxy configurations, or connections to external services to be established before they start. Init Containers can handle these tasks, setting up the networking environment just the way your app expects.
Clone Code or Configuration Files
Need dynamic configuration files or runtime code that isn’t part of your container image? No problem. You can use an Init Container to pull code, configuration files, or assets from a Git repository and place them into a shared volume.
Perform Security Checks
Before your application starts, it’s often a good idea to run health or security checks. An Init Container can perform vulnerability scans, verify that sensitive files exist, or validate SSL/TLS certificates adding an extra layer of safety to your deployments.
Fetch Secrets from External Vaults
In situations where you can’t store sensitive data like API keys in Kubernetes Secrets (maybe due to security policies or compliance requirements), an Init Container can securely fetch those secrets from services like AWS Secrets Manager or HashiCorp Vault, and make them available to the application container through a shared volume.
Prepare the Application Environment
Sometimes your app needs specific directories created, permissions applied, or setup scripts executed before it can start. An Init Container is perfect for this it can handle environment preparation tasks cleanly and exit once done.
Wait for Dependent Services
If your application depends on another service (like a database, API, or message broker) being online before it runs, an Init Container can perform connection checks and wait until those services are ready, preventing premature container startup failures.
Practical Example: Displaying Pod IP with Init Containers
Init containers are defined in the spec.initContainers field of a Pod’s manifest. This is similar to a regular spec.containers definition. We can define as many containers under initContainers section.
Let’s walk through a practical, hands-on example to see Init Containers in action.
Use Case:
We want to create an Nginx web server Pod that displays its own Pod IP address on the default index page when accessed through a browser.
How This Setup Works
To achieve this, we’ll use two Init Containers followed by the main Nginx container. Here’s the plan:
write-ipInit Container
This container retrieves the Pod’s own IP address using an environment variable (MY_POD_IP) provided by Kubernetes. It then writes that IP address to a text file calledip.txtinside a shared volume called/web-content.
initContainers:
  - name: write-ip
    image: busybox
command: ["sh", "-c", "echo $MY_POD_IP > /web-content/ip.txt; echo 'Wrote the Pod IP to ip.txt'"]create-htmlInit Container
The second Init Container reads theip.txtfile created by the first container, then generates a simple HTML page namedindex.htmlcontaining the Pod’s IP address. This HTML file is saved to the same/web-contentvolume.web-container(Main Nginx Container)
Finally, our Nginx container starts up, mounting the/web-contentdirectory to Nginx’s default web directory (/usr/share/nginx/html). It then serves the generatedindex.htmlpage when accessed.
Full Pod YAML Example
Save the following content into a file named init-container.yaml:
apiVersion: v1
kind: Pod
metadata:
  name: web-server-pod
spec:
  initContainers:
  - name: write-ip
    image: busybox
    command: ["sh", "-c", "echo $MY_POD_IP > /web-content/ip.txt; echo 'Wrote the Pod IP to ip.txt'"]
    env:
    - name: MY_POD_IP
      valueFrom:
        fieldRef:
          fieldPath: status.podIP
    volumeMounts:
    - name: web-content
      mountPath: /web-content
  - name: create-html
    image: busybox
    command: ["sh", "-c", "echo 'Hello, World! Your Pod IP is: ' > /web-content/index.html; cat /web-content/ip.txt >> /web-content/index.html; echo 'Created index.html with the Pod IP'"]
    volumeMounts:
    - name: web-content
      mountPath: /web-content
  containers:
  - name: web-container
    image: nginx
    volumeMounts:
    - name: web-content
      mountPath: /usr/share/nginx/html
  volumes:
  - name: web-content
    emptyDir: {}
Deploying the Pod
Apply the manifest using:
kubectl apply -f init-container.yaml
To check the Pod’s status:
kubectl get pods
As we discussed earlier, Init Containers are designed to run one after another, complete their job, and then exit. Once both Init Containers finish setting up the index.html file, they stop running. After that, Kubernetes starts the main Nginx container, which stays active and serves the page.
Even though our Pod has three containers in total (two Init Containers and one main container), if you check the status after deploying the Pod, you’ll only see one container actively running and that’s the Nginx container.
As you can see, both Init Containers completed their tasks successfully and printed the expected messages in their logs.
Check the logs for the first Init Container:
kubectl logs web-server-pod -c write-ip
You should see:
Wrote the Pod IP to ip.txt
Now, check the second one:
kubectl logs web-server-pod -c create-html
And it should display:
Created index.html with the Pod IP
To confirm that our Nginx Pod is serving the custom HTML page we created, we’ll forward a local port to the Pod:
kubectl port-forward pod/web-server-pod 8080:80
Then, open your browser and visit https://localhost:8080 you should see a simple web page showing your Pod’s IP address.
Allocating CPU and Memory Resources to Init Containers
Init containers require CPU and memory resources to run to complete the specific tasks. The limits and requests can be set up based on the criticality of the tasks.
If there are several init containers the highest values set for any init container is called the effective init request/limit. Meaning, that if you have an init container without a CPU/Memory limit set, it can use the maximum of the effective init request/limit.
Example: Defining Resources for an Init Container
You can set these resource values directly in your Pod YAML under the resources field for each Init Container, like this:
spec:
  initContainers:
  - name: setup-job
    image: busybox
    resources:
      requests:
        cpu: "50m"
        memory: "64Mi"
      limits:
        cpu: "100m"
        memory: "128Mi"
It’s a good practice to monitor how much CPU and memory your Init Containers actually use, and adjust these values to avoid overcommitting your cluster resources while still ensuring your tasks run smoothly.
Using Volumes with Init Containers
Volumes are an essential part of working with Init Containers because they allow different containers within the same Pod to share data. This is especially helpful when you need to set up files, configuration, or resources before your main application starts.
For example, sometimes application may require access to a dataset or files that we don’t want to bundle within the container image due to size constraints. In this case, an Init Container can be used to fetch and load these datasets into a shared volume and further, this volume can be used by the main container. Below is the example YAML file:
apiVersion: v1
kind: Pod
metadata:
  name: volume-example-pod
spec:
  initContainers:
    - name: download-dataset
      image: busybox
      command: ["wget", "-O", "/data/dataset.zip", "https://example.com/dataset.zip"]
      volumeMounts:
        - name: data-volume
          mountPath: /data
    - name: unzip-dataset
      image: busybox
      command: ["unzip", "/data/dataset.zip", "-d", "/data"]
      volumeMounts:
        - name: data-volume
          mountPath: /data
  containers:
    - name: main-app
      image: main-app-image
      volumeMounts:
        - name: data-volume
          mountPath: /app-data
  volumes:
    - name: data-volume
      emptyDir: {}
Native Sidecars with Init Containers
Starting from Kubernetes v1.28, a new feature called native sidecar containers was introduced, using Init Containers in a slightly unconventional way. And as of Kubernetes v1.33, this feature has graduated to stable.
Native sidecar support in Kubernetes is based on a clever idea called the persistent Init Container. In simple terms, it’s an Init Container that doesn’t exit once its initial task is done it stays alive and continues running alongside the main containers for the lifetime of the Pod.
This behavior is controlled by adding a restartPolicy: Always field inside the Init Container’s spec.
By default, Init Containers run once and exit. But if you set this attribute, it transforms the Init Container into a native sidecar container.
💡 Without
restartPolicy: Alwaysit’s a one-shot Init Container.
With it — it becomes a continuously running sidecar container.
Example Scenario: Nginx and Fluentd Sidecar
- An nginx web server pod with an nginx main container that writes logs to /var/log/nginx volume mount.
- We need a native sidecar fluentd logging agent container that reads all the nginx logs from /var/log/nginx.
Here is the Pod YAML for the above use case. The nginx-logs volume mount is common for the logging-agent sidecar container and nginx main container. The restartPolicy: Always is added to the logging-agent init container to make it behave like a sidecar container.
apiVersion: v1
kind: Pod
metadata:
  name: webserver-pod
spec:
  initContainers:
  - name: logging-agent
    image: fluentd:latest
    restartPolicy: Always
    volumeMounts:
    - name: nginx-logs
      mountPath: /var/log/nginx

  containers:
  - name: nginx
    image: nginx:1.14.2
    ports:
    - containerPort: 80
    volumeMounts:
    - name: nginx-logs
      mountPath: /var/log/nginx

  volumes:
  - name: nginx-logs
    emptyDir: {}
To test it, save it as sidecar.yaml and deploy it using kubectl.
kubectl get pods
You should see 2/2 containers running, one for the Nginx app and one for the native sidecar Fluentd agent.
Overall, the native sidecar containers have the following key properties:
- Independent Lifecycle:
Native sidecar containers have their own lifecycle they won’t block the Pod from terminating cleanly like older sidecar implementations sometimes did. - Lifecycle Handlers and Probes: We can add PostStart and PreStop lifecycle handlers and probes (startup, readiness, liveness) to ensure sidecar readiness & pod readiness.
Comprehensive Init Container YAML
Let’s see what an Init Container object YAML file looks like if we add all the supported parameters. To get information on all the supported fields you can use the following kubectl command.
Tip: If you ever want to check which fields are available for Init Containers in your Kubernetes version, you can run:
kubectl explain pod.spec.initContainers
This command provides a detailed list of supported attributes and descriptions for each
Below is the comprehensive Init Container YAML.
spec:
  initContainers:
  - name: init-container
    image: busybox:latest
    command:
    - "sh"
    - "-c"
    - "echo Initializing... && sleep 5"
    imagePullPolicy: IfNotPresent
    env:
    - name: INIT_ENV_VAR
      value: "init-value"
    resources:
      limits:
        memory: "128Mi"
        cpu: "500m"
      requests:
        memory: "64Mi"
        cpu: "250m"
    volumeMounts:
    - name: init-container-volume
      mountPath: /init-data
    ports:
    - containerPort: 80
    securityContext:
      runAsUser: 1000
      runAsGroup: 1000
      capabilities:
        add: ["NET_ADMIN"]
    readinessProbe:
      httpGet:
        path: /
        port: 80
      initialDelaySeconds: 5
      periodSeconds: 10
    livenessProbe:
      httpGet:
        path: /
        port: 80
      initialDelaySeconds: 15
      periodSeconds: 20
    startupProbe:
      httpGet:
        path: /
        port: 80
      initialDelaySeconds: 5
      periodSeconds: 5
    lifecycle:
       postStart:
         exec:
           command: ["/bin/sh", "-c", "echo 'PostStart'"]
       preStop:
         exec:
           command: ["/bin/sh", "-c", "echo 'PreStop'"]
    restartPolicy: Always
  volumes:
  - name: init-container-volume
    emptyDir: {}
There are also other fields like workingDir, volumeDevices, resizePolicy related to init container volumes.
Key Functions of Init Containers
Init Containers play a crucial role in setting up your application’s environment inside a Kubernetes Pod. Here are some of the main things they handle:
- The Init containers will complete all the dependent tasks before starting the main container.
- The temporary volume created by the Init container to store the configuration can be used as the persistent storage for the main container, even if the Init container task is completed.
- For databases, the Init container can fetch and store all the schemas and tables, so that the database container can directly access them when it starts.
- Init containers can ensure the external service availability before the main application starts to communicate with them.
Best Practices for Using Init Containers
When working with Init Containers in Kubernetes, following some tried-and-true practices can help keep your deployments reliable and easy to manage. Here’s what you should keep in mind:
- Ensure init containers are designed to do specific tasks quickly without using too many resources.
- If you have multiple initialization tasks, use separate init containers for each task. This helps manage and troubleshoot them individually.
- Init containers can fail, so plan for that. Implement retries, back-off strategies, and clear error messages to diagnose and resolve issues effectively.
- Take advantage of the pre-run and post-run hooks provided by Kubernetes to run custom scripts or commands during specific phases of a container’s lifecycle.
- Protect sensitive information used during initialization and avoid disclosure.
- Make sure the init containers have enough resources allocated. A lack of resources can cause initialization tasks to fail or be delayed
Init Container vs Sidecar Container: What’s the Difference?
While both Init Containers and Sidecar Containers work alongside your main application container in a Pod, they serve very different purposes and behave differently. Here’s a clear breakdown:
| Feature | Init Container | Sidecar Container |
|---|---|---|
| Purpose | Prepares the environment or performs setup tasks before the main container starts. | Provides ongoing, supplementary functionality alongside the main container. |
| Lifecycle Timing | Runs before the main container and exits after completing its task. | Starts with the main container and runs for the entire duration of the Pod. |
| Execution Pattern | Runs sequentially (one after another if multiple Init Containers). | Runs concurrently with the main application container. |
| Resource Sharing | Does not share network and storage with main container (unless explicitly mounted via volumes). | Shares the same network and storage namespace as the main container. |
| Use Cases | Downloading config files, initializing volumes, database schema setups, running pre-checks. | Log shipping, metrics collection, service proxies, security scanners. |
| Native Support for Probes & Lifecycle Hooks | Limited, no liveness/readiness probes (unless it’s a native sidecar in newer Kubernetes versions). | Full support for liveness, readiness, and startup probes, plus lifecycle hooks. |
Quick Summary
- Use Init Containers when you need to perform setup steps before your application starts.
- Use Sidecar Containers for services that need to run alongside your main app, like log shippers, proxies, or monitoring agents.
Together, they make Kubernetes Pods more flexible, resilient, and easier to manage.
Final Thoughts
In this guide, we took a deep dive into Kubernetes Init Containers, exploring what they are, how they function, and why they’re a powerful tool for production-ready containerized applications. We covered practical use cases, from fetching secrets securely to waiting for services, setting up environment prerequisites, and managing shared volumes.
You also saw hands-on YAML examples, resource allocation tips, and even learned about Native Sidecars, a more recent Kubernetes feature.
Bottom line:
If you’re building containerized applications on Kubernetes, Init Containers are a reliable way to make sure your application environment is perfectly prepped before your main services go live. They help enforce order, boost security, and ensure smooth, predictable deployments something every DevOps engineer values.
Your Thoughts?
I hope this tutorial shed some light on the power and practicality of Kubernetes Init Containers, but as you know, the Kubernetes ecosystem is always evolving. There’s always something new to learn, optimize, or experiment with.
If you’ve tried Init Containers in your projects, have a question, or just want to share a cool use case. Drop a comment below!